Following up on the CentOS 7 root filesystem on tmpfs post, here comes a guide on how to run a ZFS enabled CentOS 7 NAS server (with the operating system) from tmpfs.
The disk image is built in macOS using Packer and VirtualBox. Virtualbox is installed using the appropriate platform package that is downloaded from their website, and Packer is installed using brew:
$ brew install packer
Three files are needed in order to build the disk image; a Packer template file, an Anaconda kickstart file and a shell script that is used to configure the disk image after installation. The following files can be used as examples:
template.json (Packer template example file)ks.cfg (Anaconda kickstart example file)provision.sh (Provision shell script example file)Create some directories:
$ mkdir ~work/centos-7-zfs/
$ mkdir ~work/centos-7-zfs/http/
$ mkdir ~work/centos-7-zfs/scripts/
Copy the files to these directories:
$ cp template.json ~work/centos-7-zfs/
$ cp ks.cfg ~work/centos-7-zfs/http/
$ cp provision.sh ~work/centos-7-zfs/scripts/
Modify each of the files to fit your environment.
Start the build process using Packer:
$ cd ~work/centos-7-zfs/
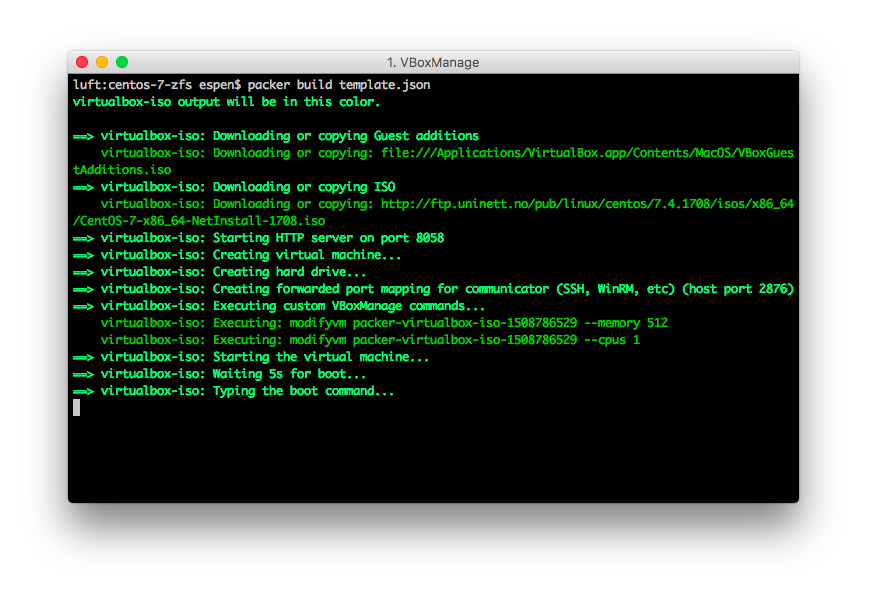
$ packer build template.json
This will download the CentOS 7 ISO file, start an HTTP server to serve the kickstart file and start a virtual machine using Virtualbox:
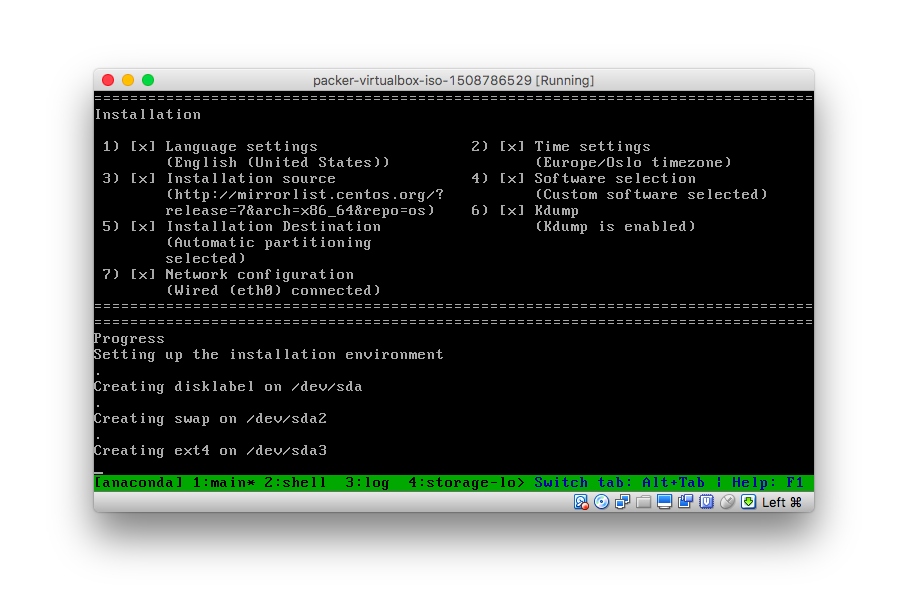
The virtual machine will boot into Anaconda and run through the installation process as specified in the kickstart file:
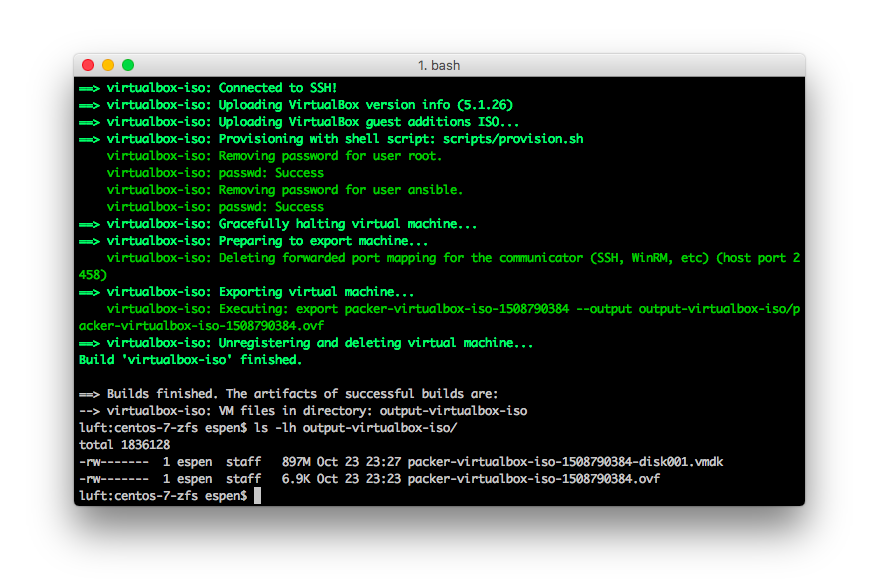
When the installation process is complete, the disk image will be available in the output-virtualbox-iso folder with the vmdk extension.
The disk image is now ready to be put in initramfs.
This section is quite similar to the previous blog post CentOS 7 root filesystem on tmpfs but with minor differences. For simplicity reasons it is executed on a host running CentOS 7.
Create the build directories:
$ mkdir /work
$ mkdir /work/newroot
$ mkdir /work/result
Export the files from the disk image to one of the directories we created earlier:
$ export LIBGUESTFS_BACKEND=direct
$ guestfish --ro -a packer-virtualbox-iso-1508790384-disk001.vmdk -i copy-out / /work/newroot/
Modify /etc/fstab:
$ cat > /work/newroot/etc/fstab << EOF
tmpfs       /         tmpfs    defaults,noatime 0 0
none        /dev      devtmpfs defaults         0 0
devpts      /dev/pts  devpts   gid=5,mode=620   0 0
tmpfs       /dev/shm  tmpfs    defaults         0 0
proc        /proc     proc     defaults         0 0
sysfs       /sys      sysfs    defaults         0 0
EOF
Disable selinux:
echo "SELINUX=disabled" > /work/newroot/etc/selinux/config
Disable clearing the screen on login failure to make it possible to read any error messages:
mkdir /work/newroot/etc/systemd/system/getty@.service.d
cat > /work/newroot/etc/systemd/system/getty@.service.d/noclear.conf << EOF
[Service]
TTYVTDisallocate=no
EOF
Now jump to the Initramfs and Result sections in the CentOS 7 root filesystem on tmpfs and follow those steps until the end when the result is a vmlinuz and initramfs file.
The first time the NAS server boots on the disk image, the ZFS storage pool and volumes will have to be configured. Refer to the ZFS documentation for information on how to do this, and use the following command only as guidelines.
Create the storage pool:
$ sudo zpool create data mirror sda sdb mirror sdc sdd
Create the volumes:
$ sudo zfs create data/documents
$ sudo zfs create data/games
$ sudo zfs create data/movies
$ sudo zfs create data/music
$ sudo zfs create data/pictures
$ sudo zfs create data/upload
Share some volumes using NFS:
zfs set sharenfs=on data/documents
zfs set sharenfs=on data/games
zfs set sharenfs=on data/music
zfs set sharenfs=on data/pictures
Print the storage pool status:
$ sudo zpool status
  pool: data
 state: ONLINE
  scan: scrub repaired 0B in 20h22m with 0 errors on Sun Oct  1 21:04:14 2017
config:

	NAME        STATE     READ WRITE CKSUM
	data        ONLINE       0     0     0
	  mirror-0  ONLINE       0     0     0
	    sdd     ONLINE       0     0     0
	    sdc     ONLINE       0     0     0
	  mirror-1  ONLINE       0     0     0
	    sda     ONLINE       0     0     0
	    sdb     ONLINE       0     0     0

errors: No known data errors